Global high-mix volume high-speed PCBA manufacturer
9:00 -18:00, Mon. - Fri. (GMT+8)
9:00 -12:00, Sat. (GMT+8)
(Except Chinese public holidays)
Global high-mix volume high-speed PCBA manufacturer
9:00 -18:00, Mon. - Fri. (GMT+8)
9:00 -12:00, Sat. (GMT+8)
(Except Chinese public holidays)
HomePage > Blog > > Bad Solder Joints: Identification, Types, and How to Fix Them
Bad solder joints are a very common problem in electronic product manufacturing, but they are often overlooked. Even a defect in a small solder joint can cause occasional malfunctions, poor performance, or even complete failure of the equipment. It is very important for engineers, technicians, or those working on electronic projects themselves to know the types of soldering defects. This not only ensures that the product is more reliable and safer but also greatly improves the quality of soldering and maintenance.
This article will elaborate on what bad solder joints are and explain how to identify and fix them. We will focus on types of soldering defects, such as cold solder joints, dry solder joints, cracked solder joints and broken solder joints. We will also compare the main differences between a good solder joint and a bad solder joint. Whether you are engaged in development, production, or maintenance, this guide can help you quickly identify and handle soldering problems.
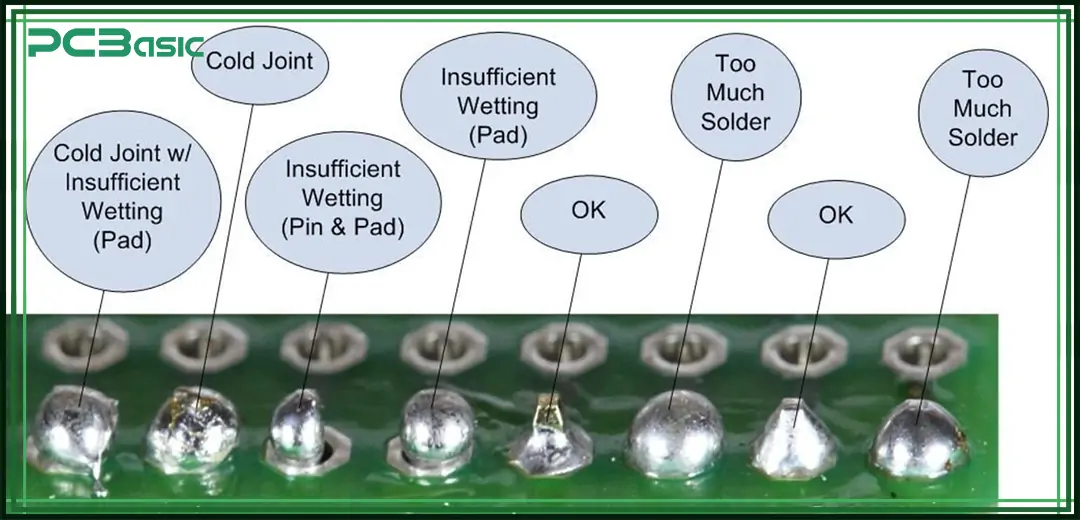
In electronic soldering, a solder joint is a physical and electrical connection between the lead of an electronic component and a copper pad on a PCB (printed circuit board). It is often achieved by heating and melting the solder and then cooling and solidifying it. Poor connection quality is likely to occur if the soldering process is not handled properly, such as insufficient heating temperature, using too little or too much solder, working on dirty or oxide on the soldering surface, or the components moving during soldering. This is called a bad solder joint.
Bad solder joints often cause unstable electrical connections, or the equipment may experience intermittent failure or performance degradation. In many cases, visual inspection may reveal uneven or rough surfaces, cracks, voids, excessive solder blobs, or areas where the solder fails to cover the pad and the component lead. In some other cases, components may become loose or even lifted due to poor soldering, which is the typical performance of poor soldering.
Gain an in-depth understanding of the various types of soldering defects, such as what a cold solder joint is, a connection formed when the solder cools before it is fully melted. A dry solder joint, where the solder does not fully wet the leads and pads, can help us better judge the quality of the solder. Only by identifying these problems can we ensure that each solder joint is reliable, firm and stable for a long time, thereby avoiding the occurrence of failures in the future.
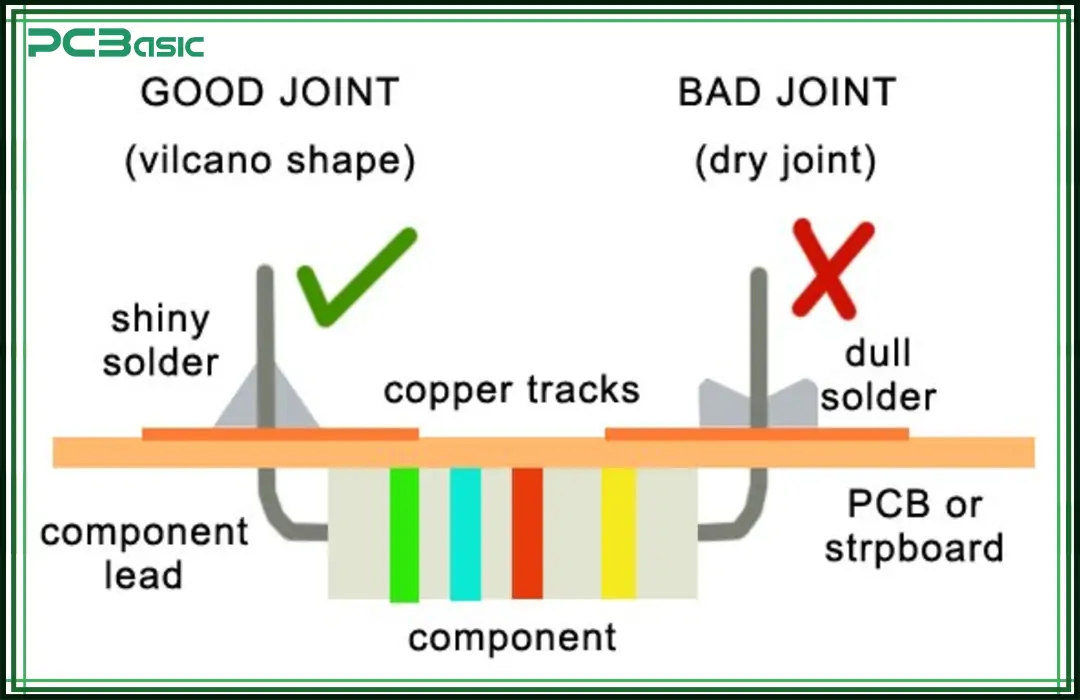
In electronic soldering, it is crucial to identify and distinguish between good solder joints and bad solder joints. A good solder joint indicates a strong and reliable connection with stable electrical performance and sufficient mechanical strength. Generally, its appearance is smooth and bright, presenting a clean, concave surface, and the solder evenly covers the component leads and pads.
On the contrary, a bad solder joint is the sign of various soldering defects. This type of solder joint cannot guarantee the reliability of long-term use and may lead to poor circuit contact, signal interference, and even equipment failure. Its common features include dull and rough surfaces of solder joints, too much or too little solder, or even unintended connections between adjacent joints (also called a solder bridge). Some bad solder joints, such as cold solder joints and dry solder joints, may also have gaps or cracks, which are among the most common types of soldering defects.
Understanding the difference between good and bad solder joints can help with self-inspection during soldering, timely repair of problems, and improving soldering quality and circuit board reliability.
|
Feature/Characteristic |
Good Solder Joint |
Bad Solder Joint |
|
Surface Appearance |
Smooth, shiny, concave shape |
Dull, rough, grainy (common in cold solder joints) |
|
Wetting |
Solder fully covers lead and pad |
Partial or no coverage (seen in dry joints, dry solder joints) |
|
Solder Amount |
Moderate, fill pad without excess |
Excessive forming blobs/bridges, or too little (forming solder-starved joint) |
|
Electrical Contact |
Stable and reliable |
Likely to have poor or intermittent contact |
|
Mechanical Strength |
Strong, can withstand minor tension or vibration |
Easily broken or loose (e.g., cracked solder joint, broken solder joint) |
|
Joint Connection |
Each joint is isolated |
Two joints unintentionally connected (solder bridge) |
|
Failure Risk |
Very low |
High risk, can lead to PCB malfunction |
Through this comparison, we can quickly identify which solder joints are qualified and which ones need to be reworked or repaired. In the following content, we will delve into the various common types of soldering defects and how to identify and fix them.
The following is a detailed description of several common types of soldering defects that cause bad solder joints.
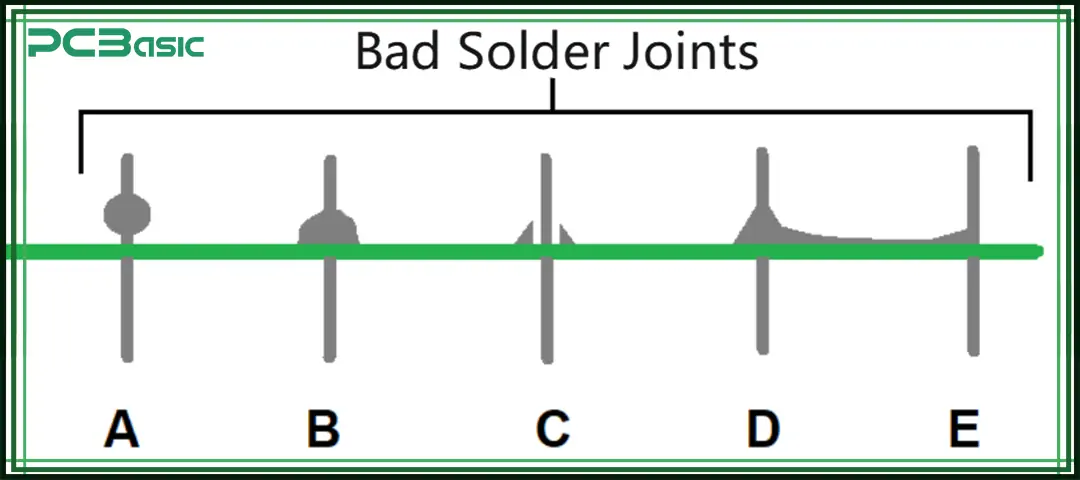
A cold solder joint is formed when the solder does not fully melt. This kind of solder joint usually appears rough, dull, grainy, and even lumpy on the surface. The reasons for cold soldering may be insufficient heating, the soldering surface being too dirty, or the components being moved during the soldering process. If you are asking what a cold solder joint is, it is one of the most common and easily overlooked bad solder joints that often result in poor circuit contact or even complete failure.
A dry solder joint refers to a situation where the solder does not adhere well to the pad or the component lead. It is usually due to the presence of an oxide layer on the surface of the pad, poor solder quality, or insufficient heating during operation. The solder joints might form a ball shape or only partially stick. Such defects are also called "dry solder" or "dry joints". It can be seen from the appearance that the solder is not evenly spread and does not wet. Dry solder joints are also unreliable connections and are prone to loosening or failure.
A cracked solder joint occurs after soldering when the joint develops small cracks due to thermal expansion and contraction, vibration, or repeated use. This type of solder joint may still work normally in the early stage, but over time, intermittent problems will start to occur in the circuit. When examined with a magnifying glass, fine cracks can be seen around the solder joint. This defect is a typical bad solder joint.
A solder-starved joint is a joint where too little solder is applied to form a reliable electrical or mechanical connection. Sometimes, this kind of solder joint can conduct electricity temporarily, but cracks will occur over time, and eventually, the solder joint will break. These bad solder joints are very easy to fix by simply reapplying solder and fully heating.
A solder bridge occurs when excess solder connects two adjacent joints, pads, or pins, creating a short circuit. This issue is not only a bad solder joint, but it can burn out components or the entire circuit board. Solder bridges usually occur in cases of manual soldering or improper control of the amount of solder.
A lifted pad refers to a copper pad on the PCB being peeled off from the board surface. It is often due to overheating, repeated rework, or impact after soldering. A broken solder joint is a joint that breaks off from a lead or pad. Both of these are severely bad solder joints. Once they occur, jumpers or other corrective measures are typically required to re-establish the connection.
|
Solder Joint Type |
Description |
Cause |
Risk or Impact |
|
Cold Solder Joint |
Dull, rough joint due to incomplete solder melting. |
Inadequate heat or contamination. |
Unreliable connection; intermittent failures. |
|
Dry Solder Joint |
The solder doesn't bond well to the pad or pin. |
Oxidation, low-quality solder, poor technique. |
Weak joint; prone to failure. |
|
Cracked Solder Joint |
Small cracks in or around the joint. |
Stress from heat, vibration, or force. |
Intermittent or total failure. |
|
Solder-Starved Joint |
Too little solder applied. |
Insufficient solder or heat. |
Weak connection; likely to fail over time. |
|
Solder Bridge |
Solder links two adjacent pads or pins. |
Excess solder or poor control. |
Short circuit; may damage components. |
|
Lifted Pad |
Copper pad pulled off PCB. |
Overheating or physical stress. |
Hard to reconnect; trace damage. |
|
Broken Solder Joint |
Solder has detached from pin or pad. |
Impact, shock, or stress. |
Open circuit; device won’t work. |
All of these types of soldering defects can lead to electrical instability, short circuits, or mechanical damage. Therefore, understanding the symptoms and causes of these defects is a critical step in preventing electronic failures.
 About PCBasic
Time is money in your projects – and PCBasic gets it. PCBasic is a PCB assembly company that delivers fast, flawless results every time. Our comprehensive PCB assembly services include expert engineering support at every step, ensuring top quality in every board. As a leading PCB assembly manufacturer, we provide a one-stop solution that streamlines your supply chain. Partner with our advanced PCB prototype factory for quick turnarounds and superior results you can trust.
Identifying bad solder joints is a crucial step in ensuring the performance and reliability of the circuit board. Here are several commonly used methods:
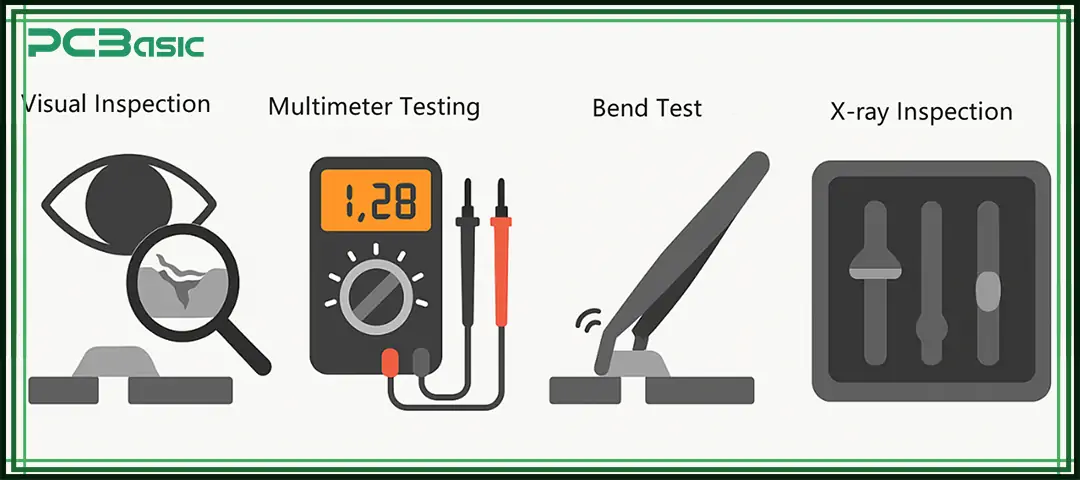
This is the most basic and commonly used method. Observe whether the surface of the solder point is dull, rough, blistered or cracked. Small defects, especially cracked solder joints, can be seen more clearly with a magnifying glass. If the shape of the solder joint is irregular, or if the component lead is not fully wrapped by solder, it may also be a bad solder joint.
Measure the resistance at both ends of the solder joint with a multimeter. If the resistance of the solder joint is too high or there is no continuity, it indicates that there may be a problem. Cold solder joints or dry solder joints are often characterized by poor contact or intermittent conduction.
Gently push the component leads with tweezers. If the solder joint is shaking or loose, it indicates that it is a bad solder joint. A normal solder joint should be very firm and not move when pushed.
For package structures like BGA, where solder joints are not visible, X-ray inspection equipment can be used to scan the interior of the solder joints. This method can detect hidden types of soldering defects, such as voids, solder bridges or solder-starved joints.
Once you find a bad solder joint, follow these steps to fix it:
Clean the Solder Joint Area
Use isopropyl alcohol to wipe the solder joint. This removes dirt, oxidation, and leftover flux. A clean surface helps the repair.
Remove Old Solder
Use a solder wick or a solder sucker to take away old or excess dry solder. This cleans the pad and pin.
Apply Flux
Put some flux on the solder joint. Flux cleans the surface more and helps the solder stick better.
Reheat the Solder Joint
Use a soldering iron to heat the pad and pin evenly. This melts the solder and gets it ready.
Add New Solder
Add the right amount of new solder to make a strong and good solder joint.
Check the Solder Joint Again
Look closely to see if the solder joint is smooth, shiny, and fully covers the pad and pin.
These steps work well to fix all kinds of bad solder joints, including cold solder joints, dry solder joints, and broken solder joints.
Bad solder joints are one of the main causes of PCB failures, but they are also some of the easiest problems to prevent. Whether it is a cold solder joint, dry solder joint, or cracked solder joint, finding and fixing them quickly is very important to keep electronic products working well for a long time.
Knowing the difference between a good solder joint and a bad solder joint, understanding the common types of soldering problems, and learning how to check, fix, and avoid these issues can greatly reduce rework and improve product quality.
Q1: What is a cold solder joint, and how do I fix it?
A cold solder joint is caused by incomplete solder melting. Reheat the joint, add flux, and apply fresh solder.
Q2: How do I know if I have a dry solder joint?
A dry solder joint looks dull or cracked and may not conduct well. It usually results from dirty surfaces or insufficient heat.
Q3: What is the difference between a good vs bad solder joint?
A good solder joint is smooth, shiny, and properly wetted. A bad solder joint is often rough, dull, or cracked.
Q4: Can I repair a broken solder joint?
Yes, most broken solder joints can be repaired by removing the old solder, cleaning the area, and resoldering with fresh flux and solder.
Q5: What causes solder-starved joints, and how can I avoid them?
They occur when not enough solder is applied. Always ensure the correct amount is used to fully bridge the lead and pad.

Assembly Enquiry
Instant Quote
Phone contact

+86-755-27218592
In addition, we've prepared a Help Center. We recommend checking it before reaching out, as your question and its answer may already be clearly explained there.
Wechat Support

In addition, we've prepared a Help Center. We recommend checking it before reaching out, as your question and its answer may already be clearly explained there.
WhatsApp Support

In addition, we've prepared a Help Center. We recommend checking it before reaching out, as your question and its answer may already be clearly explained there.
