Whether you're an electronics hobbyist repairing old circuit boards or an engineer working on next-generation prototypes, reflow soldering is an essential process in your toolkit. Using controlled heat to "reflow" molten solder allows for the precise simultaneous attachment of numerous tiny surface-mount components with unmatched efficiency.
Reflow soldering has revolutionized electronic manufacturing, enabling the miniaturization and complexity we now take for granted in our smartphones, laptops, and countless other devices. Gone are the days of painstaking manual soldering under a microscope. Today's state-of-the-art surface-mount technology relies on reflow's ability to seamlessly attach minuscule components mere millimeters in size.
Have you ever wondered how reflow soldering is done? What equipment is required? What processes ensure uniform heating and reliable connections?
In this guide, we'll explain everything you need to know to successfully use reflow soldering in your work.
Understanding Reflow Soldering
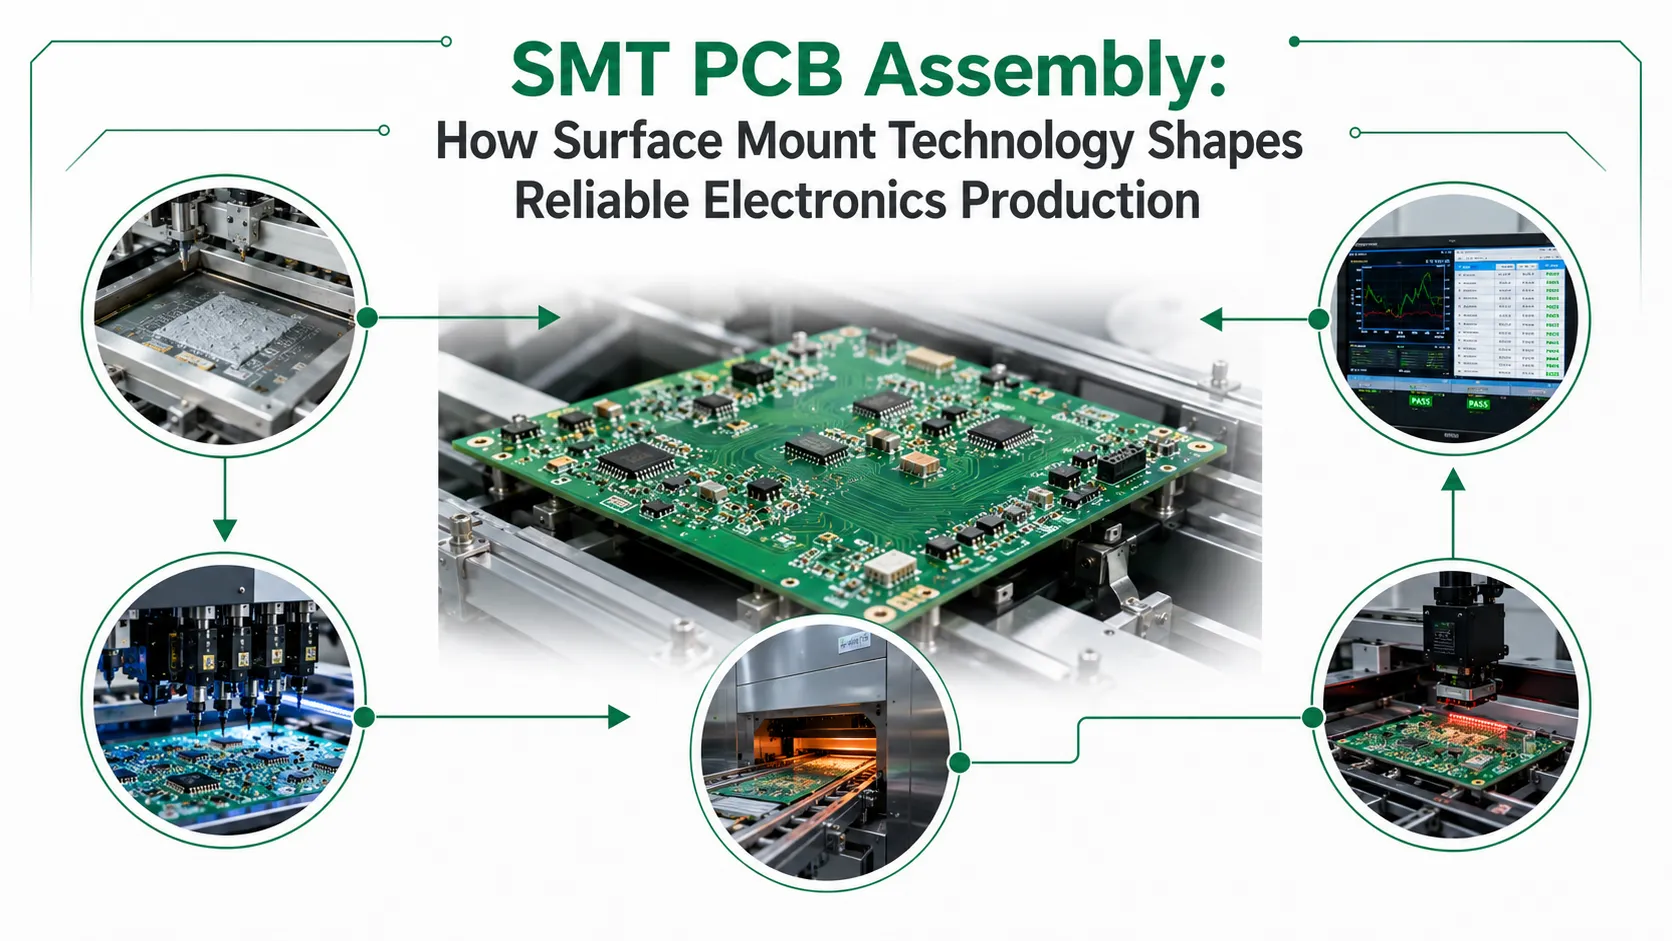
Reflow soldering is one of the major manufacturing processes used in the surface mount technology (SMT) production of PCBs. It is a procedure for soldering the electronic components (such as ICs, resistors, and capacitors) to the conductive pads of a PCB.
In reflow soldering, a thin layer of solder paste is screen-printed to the PCB pads with a stencil. This solder paste contains a mixture of solder spheres and flux which hold the spheres together. The surface mount components are next aligned onto the pads by use of the pick and place machine. Components such as the board are then transported to the reflow oven where they are heated under well-defined thermal profiles.
Moving on, in the reflow soldering process, the temperature steadily increases within the reflow oven, passing through distinct temperature zones tailored for various component and soldering requirements. In the reflow stage, the solder paste melts and the flux helps with the process by removing oxidation from the pads and component leads. It gives the solder the necessary time to wet the molten solder without bridging between adjacent pads. When the board cools down, the solder becomes hard and it forms a permanent physical and electrical connection between components and the printed circuit board.
Fusion soldering is the most common method employed in mass production, thanks to its high productivity and the high quality of solder joints. This is the ideal design for SMT boards with dense packages and miniature components. The ovens with reflow technology ensure steady and constant heat distribution for the large boards, thus preventing defects caused by temperature variations.
Correct control of time and temperature profiles is a must for solder joints to be generated properly as well as for the unharmed temperature-sensitive components of the device. It is in this sense that reflow soldering is becoming a necessity for the current production of sophisticated electronics.
About PCBasic
Time is money in your projects – and PCBasic gets it. PCBasic is the pcb assembly company that delivers fast, flawless results every time. Our comprehensive PCB Assembly Services include expert engineering support at every step, ensuring top quality in every board. As a leading PCB Assembly Manufacturer, we provide a one-stop solution that streamlines your supply chain. Partner with our advanced PCB Prototype Factory for quick turnarounds and superior results you can trust.
The Procedure of Reflow Soldering
Reflow soldering involves several critical preparation and assembly steps to ensure precise placement and bonding of components. Here is a detailed overview of the steps you need to follow in a reflow soldering station.
1. Preparation
The first stage is preparing the board and components for soldering. This involves applying solder paste and positioning the electronic components.
Applying the Solder Paste
Solder paste is a mix of fine solder powder suspended in a flux vehicle. It is applied to the circuit board pads and lands where solder joints need to form. A solder stencil with precise openings is used so the paste is deposited accurately in just the right amount and location. This helps ensure good wetting and bonding during reflow. Most assembly lines use an automated stencil printer to do this repeatably at high speeds.
The stencil must be customized for the specific PCB design with openings that directly align to the pad locations and sizes. It is fabricated from thin sheets of stainless steel, brass, or polymer materials using laser cutting or etching techniques to achieve the required resolution and printing fidelity.
Several factors influence the stencil printing process and the quality of solder paste deposition:
● Stencil Design: Stencil thickness, opening geometry, land widths, reductions, and bridging elements all impact the solder transfer efficiency and print quality achieved. Thinner stencils allow for smaller deposits but are less durable, while thicker stencils are more robust but limited resolution.
● Solder Paste: The rheology, metal content, and particle size distribution of the paste must be optimized for the intended process. Higher viscosity pastes print well but release poorly from the stencil, while low viscosity pastes tend to bridge between pads more easily. Choosing the right paste for the application and equipment is critical.
● Printing Speed: Moving the squeegee over the stencil too quickly can leave solder paste strands behind or create an uneven deposit. Conversely, printing too slowly wastes time without significant benefit. Equipment and processes are tuned for an optimum speed range.
● Squeegee Angle & Pressure: The squeegee must be set at just the right angle, typically between 15-30 degrees, and apply the proper downward force to shear the paste and clear the stencil openings without disturbing the pads. Too steep an angle or light pressure leads to incomplete prints.
Monitoring and controlling these factors results in consistent placement of precise volumes of solder paste in the targeted locations on the PCB. This provides an ideal foundation for subsequent solder joint formation through reflow.
Assembling the Components
Once the solder paste is applied, the electronic components like integrated circuits, resistors, and connectors are placed on the board. For small production runs, this is done manually with tweezers or vacuum pick-and-place tools. Larger volumes use high-speed surface mount placement machines that can pick and place thousands of components very quickly.
High-speed contact pickup heads rely on vacuum or capillary action to securely grip components without damage. Modern reflow soldering machines can place thousands of parts per hour with placement accuracy within +/-50 microns or better.
Component recognition and orientation are crucial initial steps. Most machines employ overhead vision systems and component data files to scan, identify, and correctly rotate parts for optimum placement onto the board. Any misplaced components could cause defects or reduced yields.
Key factors that contribute to the efficiency and accuracy of the pick and place process include:
● Placement Speed: Modern equipment is capable of speeds over 200,000 cph for small components, maximizing throughput. However, speed must be balanced against accuracy demands.
● Machine Accuracy and Repeatability: Placement variability (3sigma) of less than 50 microns laterally and vertically allows for tight manufacturing tolerances and minimal rework. Accuracy is maintained across the full component range and operating envelope.
● Feeder Capacity and Changeover Time: High-capacity tape-and-reel or bulk feeders optimize runtime before replenishment is required. Fast, simple feeder changes when needed minimize downtime spent loading new parts.
The components self-align on the wet solder paste as they are gently pressed into place. Finally, any through-hole components like connectors are manually inserted and their wires soldered on the opposite side.
2. Reflow Soldering Stage
Now it's time for the magic of reflow soldering to occur. The prepared board enters the reflow oven for precise heating. During this stage, two processes take place.
Reflow Oven Process
Circuit boards are conveyed into the reflow oven on a stainless steel belt or conveyor. Inside, they pass through multiple heated zones including top and bottom heat sources. Infrared lamps, hot air impingement jets, and heated surfaces work together to apply exactly the right amount and distribution of heat. Temperature is carefully monitored and controlled with thermocouples, ensuring each board experiences the same thermal profile.
Melting the Solder Paste
As the board on the reflow soldering conveyor warms up according to the thermal profile, the solder paste gradually reaches its melting point. Flux activators release gases that help clear away oxides on the component leads and board surfaces.
Reflow soldering allows molten solder to wet these clean metal surfaces, forming a metallurgical bond when cooled. All of this occurs seamlessly within a few minutes in the reflow oven, permanently joining the components in their places. The oven exhaust filters capture any smoke or fumes generated during the process.
The result is durable, high-quality solder joints that provide mechanical mounting and electrical connections. Surface mount components with their tiny termination widths are reliably assembled this way.
3. Temperature Control
A key part of reflow soldering is managing the temperature rise accurately. Component damage must be prevented while ensuring optimal soldering conditions.
Gradual Heating Method
Boards enter the reflow soldering toaster oven at room temperature and are slowly warmed through multiple thermal zones. Infrared heaters and air impingement jets heat the board and components gradually from all sides. This avoids any thermally-induced mechanical stresses. A gentle ramp rate of around 1-3°C/second is typical.
Meeting Thermal Requirements
Each component has a maximum temperature rating that must not be exceeded. More heat-sensitive parts like oscillators, crystal filters, and sensors require even lower temperatures. The reflow profile closely follows the thermal requirements of the most temperature-sensitive component used. Multiple thermocouples accurately measure and control the temperature at different points, ensuring uniform and safe heating.
4. Heating Stages
Most reflow profiles involve four distinct stages of heating to prepare, activate, and finally melt the solder. These are the different stages that it involves.
Ramp to Soak Zone
The ramp to soak zone is the initial heating stage in reflow soldering. In this stage, the temperature of the PCB assembly is gradually increased in a controlled manner. The ramp rate, which is the rate of temperature increase, is typically between 1-5°C/second. A slower ramp rate helps ensure even and consistent warming of the entire board and its components to prevent issues like thermal stresses.
As the temperature starts to rise during ramping, the volatile organic compounds (VOCs) in the solder paste begin to evaporate out. Solder pastes contain solvents that keep the solder powder in a viscous, paste-like form suitable for printing or dispensing. These solvents need to fully evaporate before reflow to form a quality joint. If any solvent is left behind in the joint, it can cause defects like solder balling or joint voids.
Thermal Soak Zone
The goal of the soak zone is to bring the entire assembly up to a consistent pre-heat temperature before continuing to the next stage. The typical pre-heat temperature range is 150-160°C for most alloys. Holding at this temperature for 1-3 minutes allows residual solvent evaporation to complete and prevents defects caused by uneven heating of components. It also pre-heats the assembly to facilitate rapid, even heating in subsequent stages.
Controlling the temperature and duration precisely is critical. Too high a temperature or long soak can cause defects like joint embrittlement or damage components that can only withstand lower temperatures. Too low/short and solvents may remain trapped. Proper profiling is determined based on the specific solder paste and assembly.
Reflow Zone
The reflow zone is the primary phase where the solder is melted. In this zone, the temperature is ramped higher than in previous stages to surpass the liquidus temperature of the solder.
The liquidus temperature is the point at which the solder first starts to melt, and is typically 30-50°C below the melting point. Most Sn-Pb and Sn-Ag-Cu alloy solders have liquidus points between 180-200°C.
The peak temperature is the maximum endured during reflow. For leaded solders, this is typically 20-40°C higher than the liquidus. Lead-free solders require higher peaks of 5-10°C above their significantly higher melting points.
Holding briefly at the peak ensures full wetting and flow of molten solder before cooling. The ideal peak time is typically 15-60 seconds depending on assembly size, density, and alloy used. Too short and solder may not fully melt and flow, while too long risks component damage from overheating.
During reflow, the molten solder wets and flows around the component terminals, joining them firmly to the PCB pads below. Simultaneously, flux activation helps remove any oxidation to ensure clean, void-free joints. Precise temperature control and profiles are vital for optimal solder wetting and flow without damage.
Cooling Zone
After the peak temperature holds, the assembly enters the cooling zone. In this final stage, controlled cooling brings the temperature back down in a controlled manner. The cooling rate is just as important as the heating rate to affect joint quality.
Gradual cooling prevents defects caused by rapid thermal shock like internal joint cracks or component cracks. The ideal cooling rate is typically 1.5-6°C/second, depending on assembly size and alloy characteristics. Slower rates permit a finer-grained joint microstructure for better mechanical integrity.
The cooling zone temperature ramp continues until ambient assembly temperature is reached, usually below 100°C. At this point, the reflow cycle is complete and heat treatment of the solder joints is finished. They should be able to withstand normal operational stresses and thermal cycling loads.
Advantages of Reflow Soldering
Reflow soldering offers many benefits over other soldering methods. The key advantages of reflow soldering include:
Automation and Consistency:Reflow soldering is a fully automated process that can consistently place and solder surface mount components on a printed circuit board. This high level of automation and consistency reduces defects and improves yields. Having a repeatable process ensures the quality and reliability of the solder joints.
Density and Miniaturization:Surface mount technology enables higher-density circuit boards by allowing for smaller components and tighter spacing between them. Reflow soldering is necessary to place and solder these ultra-fine pitch components. This density and miniaturization have allowed for tremendous reductions in the size of electronics over the past few decades.
Mass Production: The automated nature of reflow soldering makes it well-suited for high-volume, mass production applications. A single reflow oven can process dozens or even hundreds of circuit boards per hour. This high throughput enables the economical production of electronics in large quantities. The automated process is also less labor-intensive than hand soldering.
Low Thermal Stress: During reflow soldering, components are secured to the board before heating. This allows all parts to be heated up and cooled down gradually and uniformly. In contrast, hand soldering risks applying localized heat repeatedly to components, which can cause thermal fatigue and potential failure over time. Reflow soldering induces less thermal stress on components and connectors.
Process Control and Optimization: Modern reflow ovens provide precise control over the temperature profile components are subjected to. The ability to carefully control conveyor speed, heating zone temperatures, cooling rates, and more allows the process to be optimized for different board designs and component mixes. Process tuning can ensure defects are minimized cost-effectively.
Reflow vs Wave Soldering: A Comparison
When assembling electronic circuit boards, the two main processes used historically have been reflow soldering and wave soldering. Here is a comparison of these techniques on several key aspects to break down their differences and suitability for various applications.
Reflow Soldering vs. Wave Soldering
|
Aspect
|
Reflow Soldering
|
Wave Soldering
|
|
Process
|
Components are pre-placed on the PCB. The board is then passed through a convection oven or infrared oven to melt the solder.
|
Components are pre-placed on the PCB. The populated board is passed through a molten solder wave where solder is deposited on all contacts at once.
|
|
Density
|
Can handle high component density boards with fine pitch components and multiple layers.
|
Works best for low to medium-density boards with through-hole components only. Not suited for fine pitch or BGA assemblies.
|
|
Components
|
Suitable for both through-hole and surface mount components including BGA, CSP, and 01005 packages.
|
Only works for through-hole components. Not compatible with modern surface mount or miniaturized parts.
|
|
Cleanliness
|
Very clean process with less dross and fewer bridges and shorts.
|
More likely to have solder bridges and shorts due to the way solder is deposited via wave. Greater chance of contaminants in solder.
|
|
Flexibility
|
Flexible and can handle a variety of board sizes and thicknesses easily. Multiple boards can be processed at once.
|
Less flexible process. Requires tooling adjustments for different board sizes. Only processes one board at a time.
|
|
Capital Cost
|
Higher upfront costs for reflow ovens and equipment.
|
Lower capital costs for wave soldering equipment which is less complex.
|
|
Control
|
Very controllable and repeatable. Tight control over profiling and cooling ensures consistent solder joints.
|
Less control over final joints due to the nature of the dip process. More variable results.
|
Reflow soldering has become the dominant process for electronics assembly today due to its flexibility in handling higher density and miniaturized surface mount components. The process is very clean with controlled heating and cooling profiles ensuring high-quality, consistent solder joints even on complex multi-layer boards.
However, the upfront costs of reflow ovens and inspection equipment are higher. Wave soldering remains suitable only for lower-density through-hole designs and offers a cheaper capital outlay though with less control and more potential defects in the soldering compared to reflow.
Addressing Challenges and Solutions in the Reflow Process
While reflow soldering offers great advantages in electronics manufacturing, it also presents some challenges that can compromise quality if not properly addressed.
Here are several common issues encountered during reflow and suitable countermeasures to ensure a robust process.
Solder Bead Formation
Solder bead formation, also called solder spattering or splattering, refers to the undesirable scattering of small solder balls and droplets across the PCB during reflow. There are a few key causes for this defect.
First, excessive solder paste volumes can lead to overflow during melting, causing the solder to fling off components and form beads. Improper stencil printing with inconsistent or oversized apertures can also deposit too much paste. Additionally, an overly aggressive reflow profile with too steep of a rise to peak temperature can cause rapid solder paste explosion.
To combat solder bead formation, firstly optimizing the stencil design and solder paste printing is critical. Ensuring uniform, controlled deposition minimizes excess paste. The reflow profile should then provide a gentle rate of rise to avoid shocking the paste. A longer soak time just below the melting point allows any outgassing to occur gradually.
Some solder pastes also contain additives that reduce spattering through controlled off-gassing. Regular stencil cleaning prevents buildup which could disturb paste release. With proper process tuning, solder bead formation during reflow can be minimized.
Component Tombstoning
Tombstoning occurs when a surface mount component lifts from the PCB during reflow due to uneven wetting forces. Reasons for uneven wetting include misaligned or tilted components, non-uniform pad metallization, and asymmetric part/board geometries which provide more solderable areas on one side. The paste underneath is then drawn up by surface tension.
To combat tombstoning, first ensure accurate, repeatable placement of symmetrical components onto well-designed mating pads. Adjusting pad dimensions or adding corner pads can promote balanced soldering where needed. Finer pitch pastes provide more controlled flows compared to chunkier variants. Carefully formulated no-clean and low-residue fluxes maximize wettability on challenging surfaces too.
A precise reflow profile with a long thermal dwell near the solder melting point also helps; this allows any partial tilting to self-correct before solidification. Post-reflow inspection catches residual tombstoning for rework. With these combined measures, component lifting defects can be effectively mitigated.
Missing Solder Joints
A solder joint that appears partially or completely absent after reflow signifies a missed connection. Common contributing factors are insufficient solder paste deposition or solderability issues. In terms of the former, reasons involve an underfilled or misaligned stencil aperture, depleted solder paste reservoirs during long print runs, or worn/damaged printing rubber squeegees.
Solutions here entail careful stencil and solder paste management practices. Regular printer/stencil maintenance and meticulous print parameter controls ensure consistent solder volumes transfer onto pads acceptably. It also helps to select pastes suited for longer printing intervals between refills/cleanings.
As for solderability issues, common remedies involve cleaning flux residuals or contaminants from the board, improving pad plating quality/coverage, and applying optimized profile dwell times over critical melting ranges. Often the root cause stems from multiple minor variables combining; their optimization creates a robust "failure-proofed" soldering process.
Solder Balling/Splattering
Like solder beads, solder balls are undesirable clumps that form during reflow rather than wetting properly. Flux chemistry imbalance primarily causes this when overly active types release excessive gasses upon heating. Other contributing factors are contaminated/oxidized solder paste or component/board surfaces lacking proper wettability treatment.
Good flux management plays a key role in solutions. Carefully selecting a type with controlled activity and optimum tackiness for the solder alloy minimizes off-gassing issues. Thorough cleaning removes residues that could foul wetting reactions. Ensuring solder paste freshness through controlled storage and use also prevents oxidization buildup. Gentle heating profiles provide a gradual gas escape to inhibit spitting/splatter.
Finally, confirming ideal surface finishes on board landings and component leads fosters reliable solder wetting every time. With minor adjustments to consumables and process tweaks, solder ball defects can largely be overcome.
Component Burning/Warpage
Localized component overheating during reflow's peak temperature dwell is a potential cause for melting/scorching of sensitive plastic packages or printed markings. Typical reasons are uneven board heating, insufficient air circulation/convection, and inaccurate reflow oven zone calibration. Failure to adequately preheat before the spike can also cause shocking thermal stresses.
A well-designed reflow profile and high-quality oven are key to prevention. Sufficient preheating brings all assembly materials up to target temp in a controlled manner. Gentle temperature ramps and a profiling system ensure ideal thermal uniformity across zones delivering distributed, consistent heat treatment.
Where possible components most vulnerable to distortion or discoloring can have their orientation optimized to heat more gradually. Attention to reflow soldering toaster oven maintenance and periodic profiling validates zone performance over time too. These measures help eliminate hot/cold spots protecting components from reflow hazards.
Insufficient/Incomplete Solder Flow
Where molten solder fails to properly flow and wet the pads/terminations of a joint during reflow, incomplete soldering arises. Common root causes are inadequate solder paste deposition, flux activity issues, component/pad geometries inhibiting flow, and non-ideal temperature profiles.
Best practices here involve using well-designed, precision-tuned stencil printing optimized for each application and paste type. Flux formulations with suitable surface-cleaning properties promote proper metallurgical bonding. Component self-alignment features assist self-centering on pads for uniform solder-wetting angles.
Reflow profiles deliver appropriate heat soaking above solder melting temperatures, with suitably long heat/mass transfer times for through-curing. In some cases, paste additions like tackifiers can improve spreading and anchoring to avoid shorts. Overall, attention across all reflow-related variables helps ensure issue-free, robust solder joints form every time.
Inspection and Quality Assurance in Reflow Soldering
Quality inspection is a crucial step in any reflow soldering process to ensure solder joints meet specifications and electronic assemblies are free of defects. By implementing thorough inspection and quality assurance protocols, manufacturers can identify potential issues early, drive process improvements, and help reduce costs associated with rework and component failures.
Here are various inspection techniques used in reflow soldering and strategies for establishing an effective quality assurance program.
Visual Inspection
Visual inspection is typically the first stage of quality control in any reflow soldering process. Operators carefully examine solder joints and surrounding areas under magnification to identify common defects like solder bridges, insufficient solder, misaligned components, and more. Manual inspection allows for human judgment but can be time-consuming and subjective.
Many companies supplement manual inspection with automated optical inspection (AOI) systems. AOI uses high-resolution cameras and software to capture and analyze images of solder joints. The software compares joints to design criteria to find anomalies.
The AOI systems typically consist of several main parts including the following;
High-resolution cameras: Optical inspection systems utilize one or several cameras to take close-up pictures of the printed circuit board (PCB). Different angles can be chosen for the camera placement depending on the system configuration. The board can be viewed from several perspectives, thus increasing the chances of finding defects.
Lighting: Consistent and stable lighting is one of the major conditions for the correct image capturing. For example, the AOI systems might be based on several sources of light with various wavelengths and angles, which create the needed contrast and shadow minimization.
Image processing software: The software works with the images that have been captured by comparing them to the reference images or design data to verify defects. The latest AOI systems are based on the algorithms of machine learning that help to make the inspection process more precise and allow to adapt to the component appearance variations and the quality of solder joints.
AOI improves speed, accuracy, and repeatability over manual inspection. However, like the human eye, AOI cannot see inside components or inspect hidden joints.
Defects identified during visual inspection may include:
● Solder bridges: Unintentional connections between joints
● Insufficient/excessive solder: Weak or short-circuited joints
● Component misalignment: Poor electrical connections
● Missing/incorrect components: Potential functionality issues
X-Ray Inspection
X-ray inspection complements visual techniques by allowing inspection of hidden solder joints underneath BGA and QFP packages. An X-ray system passes beams through components to generate radiographic images of internal solder joints. Inspectors or software then analyze images for voids, cracks, bridging, and other defects not visible externally.
While powerful, X-ray also has limitations. False positives can occur, and differentiating similar-density materials like solder and flux can be challenging. Correlating X-ray results with other techniques helps minimize interpretation errors. X-ray also exposes operators to radiation, requiring appropriate safety protocols.
Typical defects identified include:
● Voids - Air pockets weakening joint integrity
● Bridging beneath components
● Insufficient/excessive solder under devices
Cut-Away Inspection
For exceptionally dense packages, manufacturers may perform a cut-away inspection. A sampling of components undergoes sectioning using techniques like focused ion beam milling. This exposes internal joints for high-magnification optical or scanning electron microscope examination. Cut-away is highly effective but destructive, so only a sample receives this treatment.
Functional Testing
Beyond physical inspection, functional testing evaluates assemblies for electrical defects. Methods like in-circuit testing, flying probe testing, and functional testing help identify failures like intermittent joints or cold solder defects that show no visual anomalies. Manufacturers must balance physical and functional testing based on their unique product tolerances and test capabilities.
Quality Assurance Program
To maximize inspection effectiveness, companies integrate inspection activities into a comprehensive quality assurance program. Key elements of such a program include:
● Establishing acceptance criteria for visual, X-ray, and functional testing based on product requirements and industry standards.
● Developing sampling plans to statistically inspect products while minimizing costs. Destructive techniques only sample a percentage.
● Creating inspection documents and checklists to standardize inspections and enable pass/fail tracking.
● Training operators on inspection procedures, acceptance criteria, and defect-recognition. Formal certification ensures consistent accuracy.
● Calibrating inspection tools on a schedule and if system specifications change. Calibration maintains test reliability over time.
● Investigating failures from field returns to enhance inspection criteria. Feedback leads to continuous improvement.
● Implementing statistical process control to monitor reflow quality over time and catch shifts before extensive failures occur.
A well-designed quality assurance program coordinated across inspection, assembly, and testing establishes accountability while driving ongoing process enhancement. Reliable inspection techniques and clear pass/fail criteria give manufacturers ongoing confidence in their soldering quality and product reliability.
Summary and Conclusion
The reflow soldering process has dramatically changed the way of assembling circuit boards via its unique attributes of efficiency, accuracy, and reliability. Through the use of precise temperature control, dwell times, and conveyor speeds, manufacturers can reach high yields and densities on their SMT lines. The smaller the components are reduced and the newer the variants like BGAs are introduced, the reflow soldering will always be the mainstay in the electronics industry.
Even though the China reflow soldering may seem complicated, the engineers of PCBasic have fully mastered the process via thousands of production runs. Through the implementation of our MES system, we control every single variable that could be a stressor for the most complicated designs.
Let your next prototype or low-volume production project's reflow be taken care of by our experts at PCBasic. Contact us today for more information on how to start your next electronic product with our wholesale reflow oven soldering service.
Frequently Asked Questions (FAQs)
What is reflow soldering?
Reflow soldering is a process where solder paste is applied to circuit boards using a stencil or screen printing. The boards are then heated up to melt the solder and form electrical connections between the components and the board. It's commonly used for surface mount technology (SMT) components which have leads that are placed directly onto the surface of printed circuit boards. Reflow soldering allows for much higher-density packaging compared to through-hole components.
How does reflow soldering work?
In reflow soldering, solder paste is first applied to a printed circuit board using a screen or stencil. This ensures the paste is deposited in the right locations. Components are then placed onto the paste. The board then goes through an oven or chamber that exposes it to carefully controlled heat. As the board heats up, the solder paste first goes through a "reflow" stage where it melts and forms preliminary connections. Once cooled, strong solder joints are formed between the components and board. Proper cooling is important to avoid defects. The finished boards then go through quality checks.
What equipment is used for reflow soldering?
There are a few main types of equipment used: reflow ovens, convection reflow ovens, and inline reflow soldering systems. Reflow ovens provide controlled heat exposure but require loading/unloading each board. Convection ovens offer a continuous conveyor belt for high-volume production. Inline systems integrate component placement, soldering, inspection, and more for fully automated assembly lines. Quartz/infrared heaters and hot air are common heating methods. Temperature profiling and monitoring ensure consistent results. Choosing the right equipment depends on your specific production needs and volume.
What are some common reflow profile types?
The most basic profile types are single-stage (simplified single peak), two-stage (lower preheat then higher reflow peak), and multi-stage (multiple preheat and reflow stages). The key stages are preheating, soaking, reflow, and cool down. Variables like peak temperature, time above liquidus, ramp rates, and cooling ramps differ. Nitrogen is often used for faster cooling. Choosing a profile depends on factors like component sizes/density, solder paste type, and board assembly. Standard profiles from solder manufacturers are a good starting point but optimization may be needed.
What are some tips for reflow soldering success?
Here are a few tips to help ensure successful reflow soldering results: Use the correct solder paste for your process, thoroughly clean circuit boards before assembly, avoid leaving components partially soldered, allow proper preheat/soak times, control and monitor temperatures closely, minimize air exposure during reflow, allow full cooling cycles, perform solder joint and manufacturing inspections, and keep equipment well maintained. Proper technique, settings validation, and quality checks can maximize yields and help troubleshoot any issues that do come up.